- Joined
- Nov 12, 2020
- Messages
- 70
- Reaction score
- 38
- Points
- 18
This is part 3, which is the last part of the: How to set up a retro (IIS) series:
What will we cover in part 3:
Arcturus Morningstar Emulator set up:
How to set up Nitro v2:
Add the Nitro WebSocket plugin:
Link Atom CMS to your nitro client:
We're almost done! the last step of our journey is to link Atom CMS to the nitro client.
You have finally made it:
Credits: Object / Dennis
What will we cover in part 3:
Arcturus Morningstar Emulator set up:
Before we can enter our hotel, we'll need to set up our emulator and to do that, the first thing we need to do is to install Java.
To install Java all you have to do is to download it -
Once Java has been downloaded, go through the setup process, by leaving everything to their default preset (Simply click "Install" and let Java install itself).
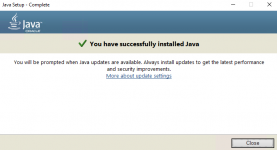
Java has been installed:
Set up the Arcturus MS Emulator:
To install Java all you have to do is to download it -
Once Java has been downloaded, go through the setup process, by leaving everything to their default preset (Simply click "Install" and let Java install itself).
Java has been installed:
Set up the Arcturus MS Emulator:
Before we download the Arcturus MS Emulator, we will need to install WinRAR, as the emulator will come pre-packed as a .rar file.
To install WinRar all you have to do is - .
Once WinRar has been installed & set up, you can go ahead and download the Arcturus Morningstar emulator - .
When you're at the download page for the emulator, find the part where it says "" now click on the "" (or you can click directly on it from this thread).
The emulator will then download, once it has been downloaded, open up the .rar file and extract the "Arcturus_MS_351_STABLE" to the desktop of your server - Here's a GIF of how to do that:
Once the "Arcturus_MS_351_STABLE" folder has been placed on your desktop, open it up and open the "config.ini" file in your preferred editor.
You will then have to edit the database credentials so that they match the ones you made when setting up MariaDB - If you don't remember your credentials, simply open the .env file located in the root folder for Atom CMS and take them from there. Once you have filled in the correct credentials, we want to put a few parameters, to allow for eg. UTF-8 characters .- Find
and replace it with
you can now safely save and close the config.ini file again.
Import the missing .SQL's & Queries:
For our emulator to function properly, we'll need to import the "UPDATE_ARCMS_300_TO_350-xxxxxx" file that comes with the emulator - It's very important that you don't import any other SQL files than the ones specified in this tutorial.
Here's a GIF of me importing the .SQL file:
Once you have imported the "UPDATE_ARCMS_300_TO_350-925b0513883fa34a34ca00b59a17833" SQL file, you'll have to run the queries provided below, which is gonna import the remaining missing data.
There you go! Your emulator should now run smoothly. The next step will be to compile & set up the nitro client - Exciting right? We're almost ready for to launch your new hotel
How to set up Nitro v2:
Finally! We're at the part where we will not only compile the Nitro v2 client but also set it all up so that we can actually have fun and play on yournewly setup hotel Exciting right? Let's get going!
Step one:
The first step on our journey of setting up Nitro v2 is to clone it and its default assets, that don't come with the pack we converted earlier.
Clone the missing default assets:
The default assets will then be cloned into the
folder - which is almost correct. To maintain a clean folder structure, move all the files from the
"C:\inetpub\wwwroot\atomcms\public\client\nitro\default-assets" into "C:\inetpub\wwwroot\atomcms\public\client\nitro" folder - If you're unsure of what to do, please watch the GIF of the entire process below.
Here's a GIF of the entire cloning process if you're unsure of how to do it:
Step 2 - Setup Nitro v2:
Step 2 - Setup Nitro v2:
Step one:
The first step on our journey of setting up Nitro v2 is to clone it and its default assets, that don't come with the pack we converted earlier.
Clone the missing default assets:
We'll need to clone the missing default assets for nitro, in order to make nitro function properly, and to do that, open your Command Prompt and enter the following:
The default assets will then be cloned into the
folder - which is almost correct. To maintain a clean folder structure, move all the files from the
"C:\inetpub\wwwroot\atomcms\public\client\nitro\default-assets" into "C:\inetpub\wwwroot\atomcms\public\client\nitro" folder - If you're unsure of what to do, please watch the GIF of the entire process below.
Here's a GIF of the entire cloning process if you're unsure of how to do it:
Step 2 - Setup Nitro v2:
Finally! We're at the part where we will not only compile the Nitro v2 client but also set it all up so that we can actually have fun and play on your new setup hotel Exciting right? Let's get going!
Step one:
The first step on our journey of setting up Nitro v2 is to clone it and its default assets, that don't come with the pack we converted earlier.
Clone the missing default assets:
Step one:
The first step on our journey of setting up Nitro v2 is to clone it and its default assets, that don't come with the pack we converted earlier.
Clone the missing default assets:
We'll need to clone the missing default assets for nitro, in order to make nitro function properly, and to do that, open your Command Prompt and enter the following:
The default assets will then be cloned into the
folder - which is almost correct. To maintain a clean folder structure, move all the files from the
"C:\inetpub\wwwroot\atomcms\public\client\nitro\default-assets" into "C:\inetpub\wwwroot\atomcms\public\client\nitro" folder - If you're unsure on what to do, please watch the GIF of the entire process below.
Here's a GIF of the entire cloning process if you're unsure of how to do it:
Step 2 - Setup Nitro v2:
In step 2, we will focus on cloning, compiling, and setting up the nitro client.
Clone Nitro v2:
To clone the nitro client, all you have to do is open your Command Prompt and write the following:
If you're unsure on how to clone the Nitro v2 repository, here's how to do it:
Now inside of the "C:\inetpub\wwwroot\atomcms\public\client\nitro\nitro-react" folder, navigate into the "public" folder and rename the "renderer-config.json.example" and "ui-config.json.example" to:
"renderer-config.json"
"ui-config.json"
Here's a GIF of that process:
Once the two config files have been renamed, open the "renderer-config.json" and the "ui-config.json" in your preferred editor and link everything correctly - Don't worry if you have been following the series from step one, you can simply replace your entire both your "renderer-config.json" and "ui-config.json" with the ones below:
Compile the nitro client:
Clone Nitro v2:
To clone the nitro client, all you have to do is open your Command Prompt and write the following:
If you're unsure on how to clone the Nitro v2 repository, here's how to do it:
Now inside of the "C:\inetpub\wwwroot\atomcms\public\client\nitro\nitro-react" folder, navigate into the "public" folder and rename the "renderer-config.json.example" and "ui-config.json.example" to:
"renderer-config.json"
"ui-config.json"
Here's a GIF of that process:
Once the two config files have been renamed, open the "renderer-config.json" and the "ui-config.json" in your preferred editor and link everything correctly - Don't worry if you have been following the series from step one, you can simply replace your entire both your "renderer-config.json" and "ui-config.json" with the ones below:
If you have been following this series 1:1, you can simply head over to and click on the green button saying "code" and then click "Download ZIP".
Once you have downloaded the ZIP file containing the two fixed nitro configuration files, simply copy both the "ui-config.json" and the "renderer-config.json" file into your "C:\inetpub\wwwroot\atomcms\public\client\nitro\nitro-react\public" folder.
Once copied and moved into your "C:\inetpub\wwwroot\atomcms\public\client\nitro\nitro-react\public" folder, open the "ui-config.json" and the "renderer-config.json" files and replace "YOUR-DOMAIN" with your domain name and save both files.
Compile the nitro client:
It's t ime for us to compile Nitro v2, so we soon will be able to play your new hotel! Start by opening your Command Prompt and navigate yourself into the nitro-react folder by entering:
Once you're inside the "nitro-react" folder enter the following command
By pinning the node with the command above, we tell that we want to use node v18.7.0 within the nitro-react project
Once you've entered the 2 commands above, it's time to install the dependencies that Nitro v2 relies on, and to do just that enter:
Nitro v2 will then start to fetch and install all its necessary dependencies.
Here's a GIF of the process:
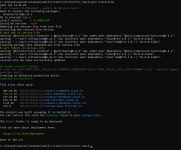
Once nitro is finished installing its dependencies, your terminal should look something like the below image.
Perfect! We've come very far already, and it's now time to build Nitro v2 into compiled assets - This is a very easy step, and doesn't require us to do much, so let's get to it!
In your command prompt make sure you're still within the "C:\inetpub\wwwroot\atomcms\public\client\nitro\nitro-react" folder, and if you aren't then simply use the command below:
Once you've verified you are within the nitro-react folder simply use the following command to compile Nitro v2
Compiling the assets might take a while, so please be patient
Here's a GIF showing some of the compilation process:
Once Nitro v2 is finished compiling, your terminal should look something like the image below.
Add the Nitro WebSocket plugin:
In order for the emulator to accept incoming WebSocket requests, that nitro will make use of, we'll need to add a plugin specifically made for Arcturus Morningstar.
Setup the Cloudflare DNS & Page rules
In order for nitro to accept our connections through the WebSockets, we'll need to do 2 things within our Cloudflare dashboard.
The first thing will be to add a DNS record and the second is to make a page rule, disabling SSL for our nitro WebSocket.
Add the DNS rule:
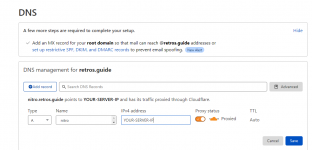
To add the necessary DNS rule, navigate yourself to the and click on the domain, that you are using for your hotel. Once you have clicked on your domain navigate to the DNS page by clicking "DNS" in the sidebar on Cloudflare.
Next up click on the blue button saying "Add record" - A new row should be added just below and inside the "Name" field write "nitro" for the "IPv4" field, write your server IP and click "Save".
If done correctly it should look like the image below:
Create a Cloudflare page rule:
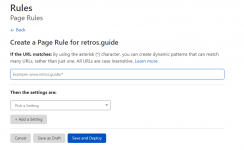
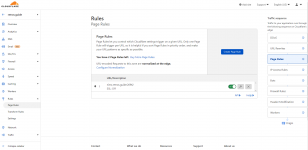
We're soon at the end of our journey, before we will be able to connect to our newly setup hotel, will be to create a page rule, disabling SSL for our nitro subdomain, and luckily for us, Cloudflare makes this extremely easy. All we have to do is find "Rules" in the side navigation of our and click on it. Once you have clicked on the "Rules" navigation link, you should see a page, with a blue button saying "Create Page Rule". Click on the "Create Page Rule", which will then take you to the following page (see the image below):
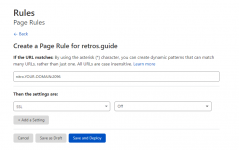
If that is the case, simply fill out the fields, so that they look like the image below:
Once you have filled out the fields, like the image above, click on "Save and Deploy"
We're soon done - Allow port 2096:
Our second last step of this amazing journey is to enable port 2096 to accept TCP connections.
To enable port 2096, simply search for "Windows Defender Firewall with Advanced Security" in your windows search menu and click on it, once you have opened the "Windows Defender Firewall with Advanced Security" application, click on "Inbound Rules" on the left and then "New Rule..." on the right, a new popup should now appear.
Once you see the popup, select "Port" and click "Next" on the next page, leave everything as it is and type "2096" in the text field next to "Specific local port" and click "Next" until you you're able to give the rule a name and enter any name of your choice - Mine will be "nitro" and then click on "Finish".
Here's a GIF of how to create the firewall rule:
Arcturus Morningstar requires a plugin for us to be able to use Nitro - The plugin is named "NitroWebsockets-3.1" and this part will explain how to add it and set it up.
First off we need to download the plugin, which you can do by - Click on "NitroWebsockets-3.1.jar" to download the plugin.
Once the plugin has been download, we must add it to our Emulator, luckily for us this is a simple process.
Star by closing your emulator, if it's running.
Next up all you have to do is to open your emulator folder on your desktop, head to the "plugins" folder within it and place the "NitroWebsockets-3.1.jar".
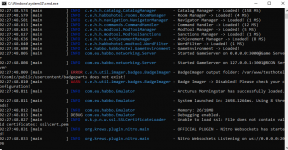
Now boot up your emulator, so that it will insert the necessary data into your database. It should look like the image below:
Once the emulator has booted fully up, close it by writing "stop" and then press enter inside of the emulator.
Here's a GIF of the entire process: .
We will now have to edit a few things within our database so that the emulator will handle our requests properly when connecting to the Nitro v2 client.
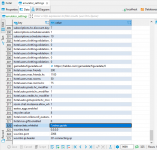
So open up DBeaver, find the "emulator_settings" table and find the "websockets.whitelist" entry. Once you've found the "websockets.whitelist" entry change its value from "localhost" to "*-YOUR-DOMAIN-WITHOUT-HTTPS://".
We'll also have to change one more thing, which is the "ws.nitro.ip.header". Once you've found it, change its value to "CF-Connecting-IP".
You can now click on "save" and the data will then be loaded upon your next emulator start.
If done correctly, it should look like the image below:
Setup the Cloudflare DNS & Page rules
In order for nitro to accept our connections through the WebSockets, we'll need to do 2 things within our Cloudflare dashboard.
The first thing will be to add a DNS record and the second is to make a page rule, disabling SSL for our nitro WebSocket.
Add the DNS rule:
To add the necessary DNS rule, navigate yourself to the and click on the domain, that you are using for your hotel. Once you have clicked on your domain navigate to the DNS page by clicking "DNS" in the sidebar on Cloudflare.
Next up click on the blue button saying "Add record" - A new row should be added just below and inside the "Name" field write "nitro" for the "IPv4" field, write your server IP and click "Save".
If done correctly it should look like the image below:
Create a Cloudflare page rule:
We're soon at the end of our journey, before we will be able to connect to our newly setup hotel, will be to create a page rule, disabling SSL for our nitro subdomain, and luckily for us, Cloudflare makes this extremely easy. All we have to do is find "Rules" in the side navigation of our and click on it. Once you have clicked on the "Rules" navigation link, you should see a page, with a blue button saying "Create Page Rule". Click on the "Create Page Rule", which will then take you to the following page (see the image below):
If that is the case, simply fill out the fields, so that they look like the image below:
Once you have filled out the fields, like the image above, click on "Save and Deploy"
We're soon done - Allow port 2096:
Our second last step of this amazing journey is to enable port 2096 to accept TCP connections.
To enable port 2096, simply search for "Windows Defender Firewall with Advanced Security" in your windows search menu and click on it, once you have opened the "Windows Defender Firewall with Advanced Security" application, click on "Inbound Rules" on the left and then "New Rule..." on the right, a new popup should now appear.
Once you see the popup, select "Port" and click "Next" on the next page, leave everything as it is and type "2096" in the text field next to "Specific local port" and click "Next" until you you're able to give the rule a name and enter any name of your choice - Mine will be "nitro" and then click on "Finish".
Here's a GIF of how to create the firewall rule:
Link Atom CMS to your nitro client:
We're almost done! the last step of our journey is to link Atom CMS to the nitro client.
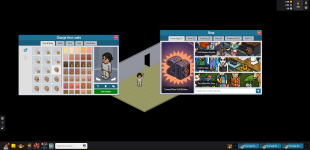
You have finally made it:
Credits: Object / Dennis
Last edited:
